Step-by-Step Procedure to Install CentOS

I have many friends and relatives who are interested in Linux, but they are not sure about the path to learn it. Linux is a kernel on which Multiple Operating Systems have been developed, including the famous Android. Basically, there are two families of the distros: Redhat  (use .rpm extension software) & Debian (use .deb extension software). CentOS is from the Redhat family, which is now owned by Redhat though its free to use in any environment. If you are interested in any other Linux installation then I have shared the links at the end of this post, meanwhile lets begin the installation in our environment.

The current version of CentOS is 7, which can be downloaded from:

https://www.centos.org/download/

I am using the 1511 version of DVD ISO at the time of writing this tutorial. Depending upon your requirement you can use other available versions of the OS. I am using the virtual installation of the OS, if you are not familiar with virtualization software then please refer the links to install them on your computer:


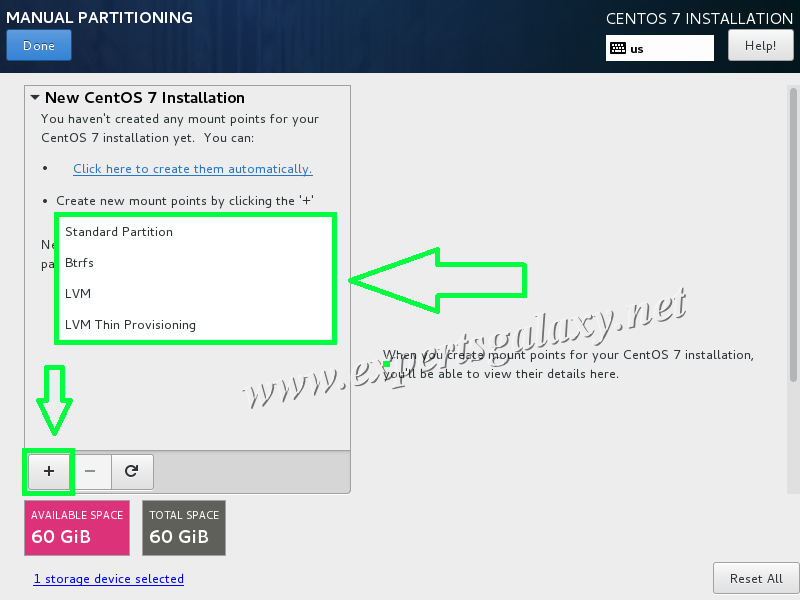
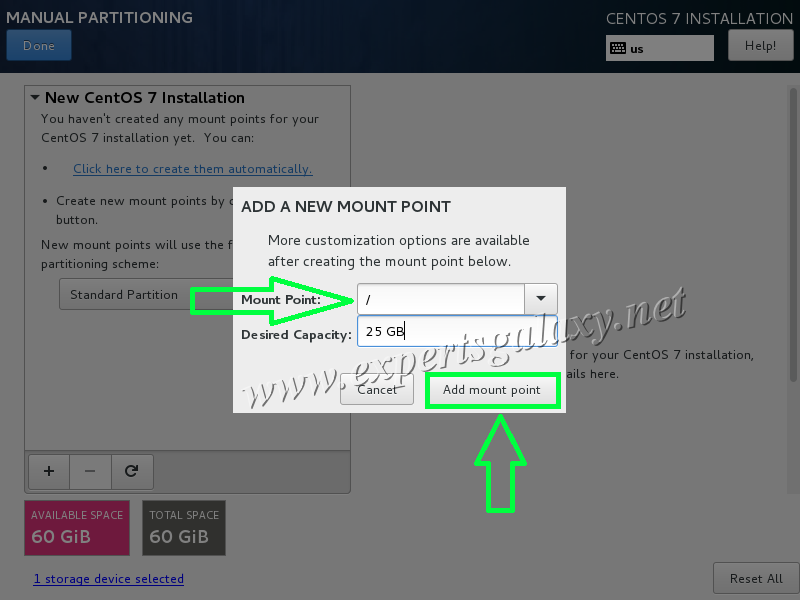
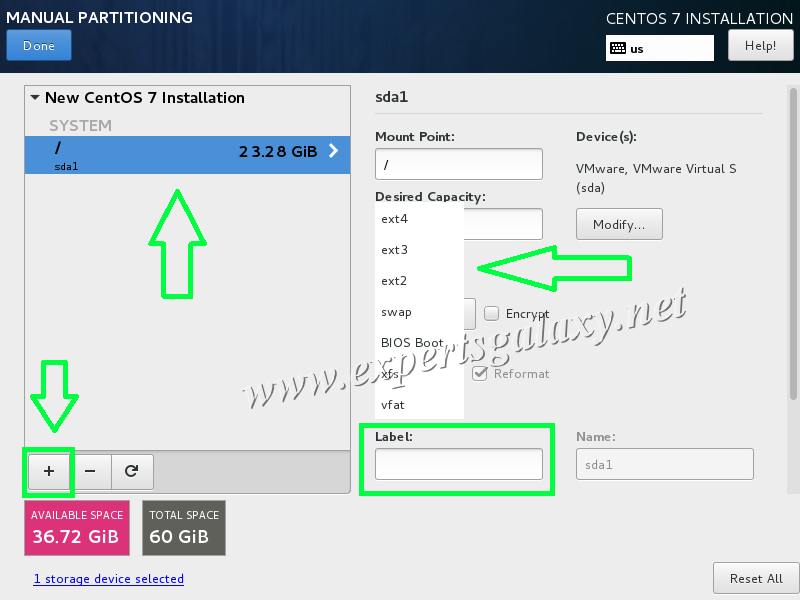
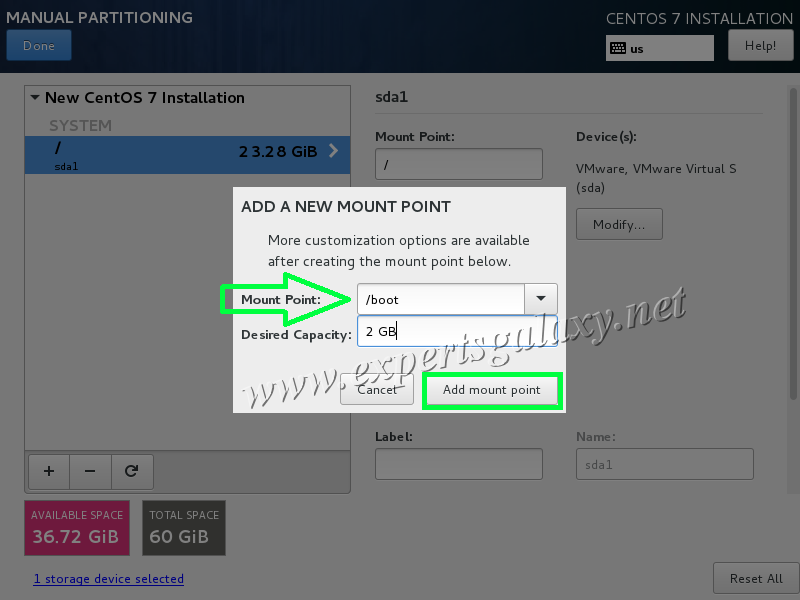
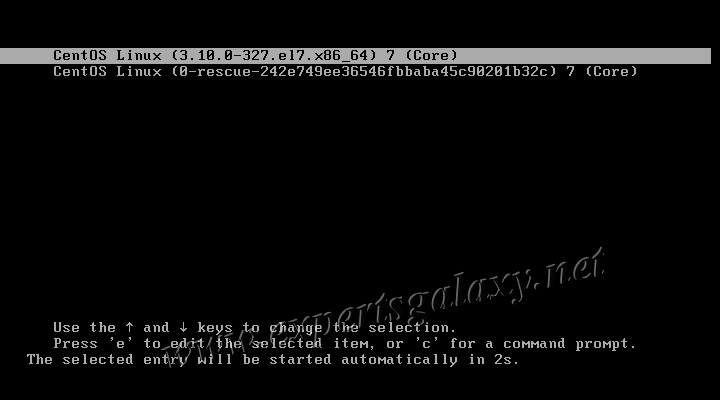
1 Make sure you set your computer to boot from ISO either written on CD/DVD or you can use a bootable USB drive for the same.


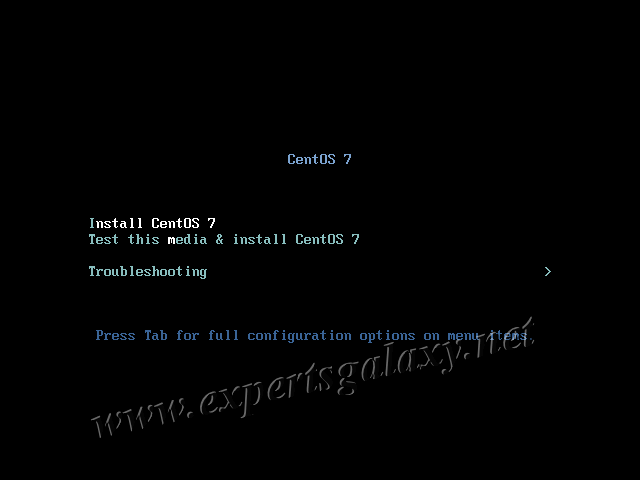
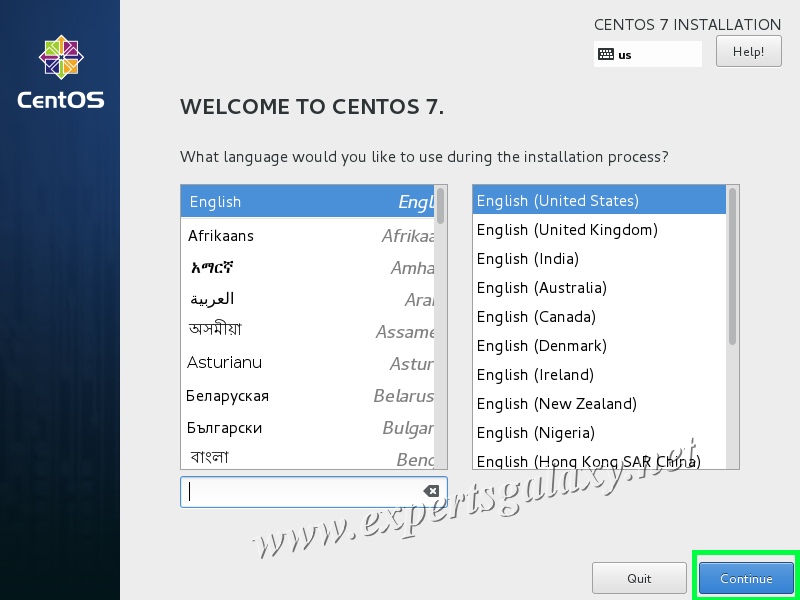
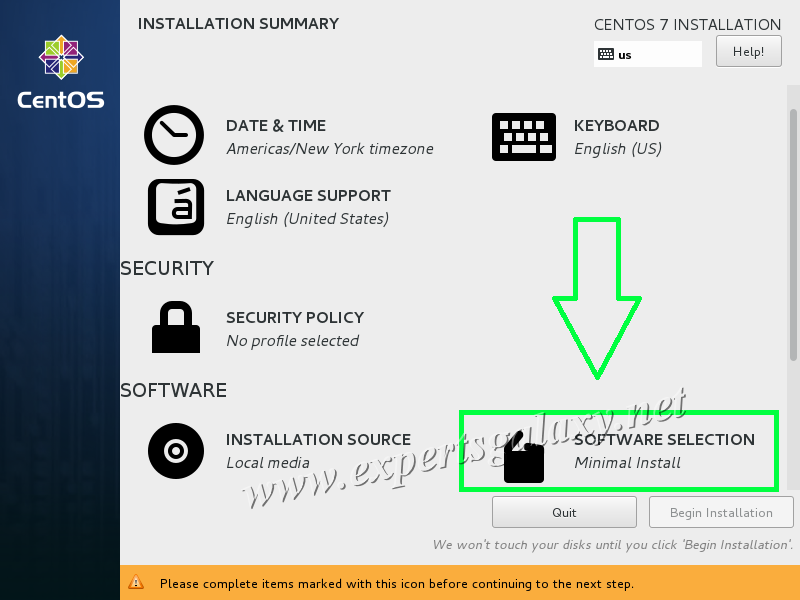
2. Then you will see the boot menu, please select install CentOS 7 as shown below:


CentOS Linux Boot Menu

 3) Now as it says, please press the enter key to  begin the installation of CentOS 7
Press Enter For CentOS Installation
 4) Then it starts the calculation, even if you see a bit of red color then also wait for the final output screen. Mostly, you would see the green oks as shown below:
CentOS Linux Starting Device Mapper.
5) Anaconda is coming, which is the installer here:
   CentOS Starting Anaconda Installer
6) Now, you will see the Welcome Screen of CentOS 7. Please select your desired language and click on continue
CentOS Linux Language Selection Screen
7) The installation summary screen will show you all the settings that you can configure as per your requirements. The software selection is minimal install as shown below, which is the OS installation without any GUI.Please click on it to change the installation type for now. If we skip this step then it will install the core version of CentOS 7, that you will find in corporate environment to reduce the attack space. Later on we can always install any Desktop Environment of our choice.
CentOS Linux Software Selection
8) You would notice that minimal install is selected. You can change it to any type of base environment as per the requirement, however lets do it GNOME desktop for now.
CentOS Linux Minimal Installation Option
9) Once GNOME is selected which is the default Desktop environment in most Linux Distros, then you can also select the add-ons for the selected environment at the RHS as shown below. We can also install and configure the add-ons later on, if not done now.
CentOS GNOME Desktop Selection
10) If you notice the software selection screen then it shows GNOME Desktop now:
CentOS GNOME Desktop Selection
11 ) Moving further, if you notice the installation destination then it has a yellow orange which needs to be cross checked. I have done both type of installation in my lab, the core installation and GUI as well 🙂
CentOS Linux Installation Summary
 12) You would see the selected disk or you can add more disk there as per your requirements, after that please click on done as shown below:
CentOS Linux Device Selection Screen
13) Now, you will not see any warnings on the installation summary screen and can begin the installation. But we will do custom partitions, so please click installation destination option again.
CentOS Automatic Partitioning Selected
14) Instead of automatically configuring partitioning, please select I will configure partitioning as shown below. We can also encrypt the data, but let it be unchecked for now and click on done.
CentOS Manual Partitioning Scheme
15) You will see all the partitioning scheme in the drop down, please select standard partition for now and we will discuss Btrfs, LVM and LVM Thin Provisioning later on. After that, please click on the “+” sign as shown below:
CentOS Manual Partitioning Screen
16)  It will ask you to add a mount point. Please select “/” from the drop down, which is known as the root directory. Linux has a directory hierarchy that starts with /. For a lab machine of 60 GB, we can keep it for 25 GB, where all the system files would reside.
CentOS Add New Mount Point
17) Once the mount point is created then we can customize it in terms of desired capacity, file system type along with the label for the mount point. By default CentOS 7 has XFS file system, however the earlier version used ext4 as the default file system and we couldn’t keep XFS for boot partition which is our next partition to be created. Please click on the plus sign again to create further partitions.
CentOS Mount Point Customization Options
18) We will now add the /boot partition, where all the necessary boot files reside. We can keep it anything from 200 MB to 500 MB, though I keep it 2GB for updates and experimental purpose. Till now, I have never faced any requirement for such space but I keep it this way.
CentOS Boot Partition Mount Point
 19) We will add the swap space now which completes our minimum requirement of the mount points. As per Redhat: Swap space in Linux is used when the amount of physical memory (RAM) is full. If the system needs more memory resources and the RAM is full, inactive pages in memory are moved to the swap space. Please refer the link mentioned below for the recommended swap space size by Redhat for version 6 & version 7 respectively:
&
Add SWAP Space Mount Point
 20) We have created all the necessary partitions as recommended by Red hat for version 7, however when I was not aware about LVM then I used to create a fourth partition as well known as the home partition. It was also recommended till version 6 and if we wish then it can be created now as well to keep the user data. If we create user accounts, then all the users get their home directory in /home as /home/user1, /home/user2 and likewise. Once created and if created then you will see all the partitions as listed below. Please click on done to proceed. If you are creating a test lab then you can skip the /home partition to practice LVM later on.
Successfully Created Standard Linux Partitions
 21) Then you will the summary screen for the custom partitions. You can either accept the changes or cancel and return for further customization. As, I don’t create the /home partition now as a standard partition so it is not listed as shown below:
Accept Linux Custom Partioning Changes
22) You will notice, now the installation destination shows custom partitioning selected so please click on begin installation.
CentOS Linux Custom Partitioning Selected
 23) It will start creating the disk labels, however you see two warning messages as shown below. Please click on the root password to select a password for the account. Root account is the built-in administrator account in any Linux based Operating System.
CentOS Linux Installation Started
 24) If you see a warning for weak password then you need to click twice on the done button, in order to keep a weak password which is not recommended by the OS.
CentOS Linux Select Root Password
   25) It will start the installation process now, however shows that no user would be created as shown below. Please click on user creation to create a regular user for non-administrative purpose.
CentOS User Creation During Installation
26) We can make this user as admin as well, but its always recommended to use a regular use for non-administrative purpose.
CentOS Linux User Account Creation
27) You can also click on advanced as shown above to set the User ID and Group ID for the user. As of now, you can skip this advanced configuration.
CentOS Linux Advanced User Configuration
28) Once you click on done then you would notice that the installation procedure is already running in the background, which will be completed in 5-20 minutes. The installation time depends upon the type of installation, if ts a minimal install or full GUI installation.
CentOS Linux Post Installation Setup
29) In my lab of 1 GB RAM, it took around 5 minutes for minimal install and 20 minutes for GNOME desktop installation. You would see an installation complete message, please click on reboot button as shown below:
CentOS Linux Successfully Installed Message
 30) If it is a core installation of CentOS then you will see a black screen with two option to select from. The second option is the rescue mode to troubleshoot issues, however lets proceed with the first option to login.
CentOS Linux Core Boot Menu
31) Then you will see the login prompt to use either the root’s credentials or the regular user created above. I will cover the installation of desktop environment in the next post to upgrade this core installation to a GUI mode.
CentOS Linux Core Local Host Login
 32) For the GNOME installation as selected in software selection option, the login screen will be as shown below. If you don’t see the user account listed then please click on not listed option.
CentOS Linux GNOME Login Screen
33) Once you click on not listed option then you can use any username in the login prompt as shown below:
CentOS 7 GNOME User Not Listed
  34) You get the bright desktop to begin your Linux journey.
CentOS 7 GNOME Desktop Environment
Friends, you can install the latest version of CentOS now in your lab environment. It works similar to Redhat Enterprise Linux (RHEL) 7 but without any support, though you get plenty of free support in the official forum and other Linux Forums.You can also get Red hat Enterprise Linux free now, being a developer from the link mentioned below and follow the steps explained above to install it.
Even if you are not a developer then also start learning programming languages so that you can contribute back to the open source world. If you have heard about any other Linux OS, then needn’t worry as I have already covered their installation procedure and would cover the remaining ones in upcoming posts. Please refer the link below to install any other Linux in your environment:
If you would like to practice few commands then here is the list of few basics commands. You can press Alt+F2 in your Linux installation and then type gnome-terminal to use the command.
To read and learn more about Linux, feel free to connect to our Linux Learning Links Facebook page, where I have already shared all the topics of RHCSA and RHCE.
Stay tuned for more 🙂

Share this post

Post Comment

CommentLuv badge